Introduction to Cloudflare Tunnels & Cloudflare Access
Explore Cloudflare Tunnels and Access for securely publishing internal apps. Enhance web infrastructure security, performance, and user experience while maintaining granular access control over your resources.


As a developer, I am always looking for ways to improve the security and accessibility of my applications. That's why I am excited to explore the powerful combination of Cloudflare Tunnels and Cloudflare Access. Tunnels provide a secure way to expose applications to the internet while Access provides granular access control and authentication for those applications. Together, these features can help me improve the security and performance of my applications while simplifying the user experience.
In this post, I will provide a comprehensive overview of both Cloudflare Tunnels and Cloudflare Access. I will cover the technical details of both features, including how they work and how to configure them. I will also share real-world use cases and examples.
Whether you are a developer looking to securely expose your applications to the internet or an organization looking to improve the security and accessibility of your internal applications, Cloudflare Tunnels and Cloudflare Access provide a powerful solution that can help you achieve your goals. Join me in exploring these two features and learn how they can help you enhance the security and performance of your applications.
Cloudflare Tunnels
As someone who values secure, reliable, and fast connections between client devices and my origin server, I find Cloudflare Tunnels to be an indispensable solution. By eliminating the need for public IP addresses, Cloudflare Tunnels have revolutionized the way I manage my web infrastructure. In this section, I'll share how Cloudflare Tunnels work, their advantages, and why they have become a game-changer for me.
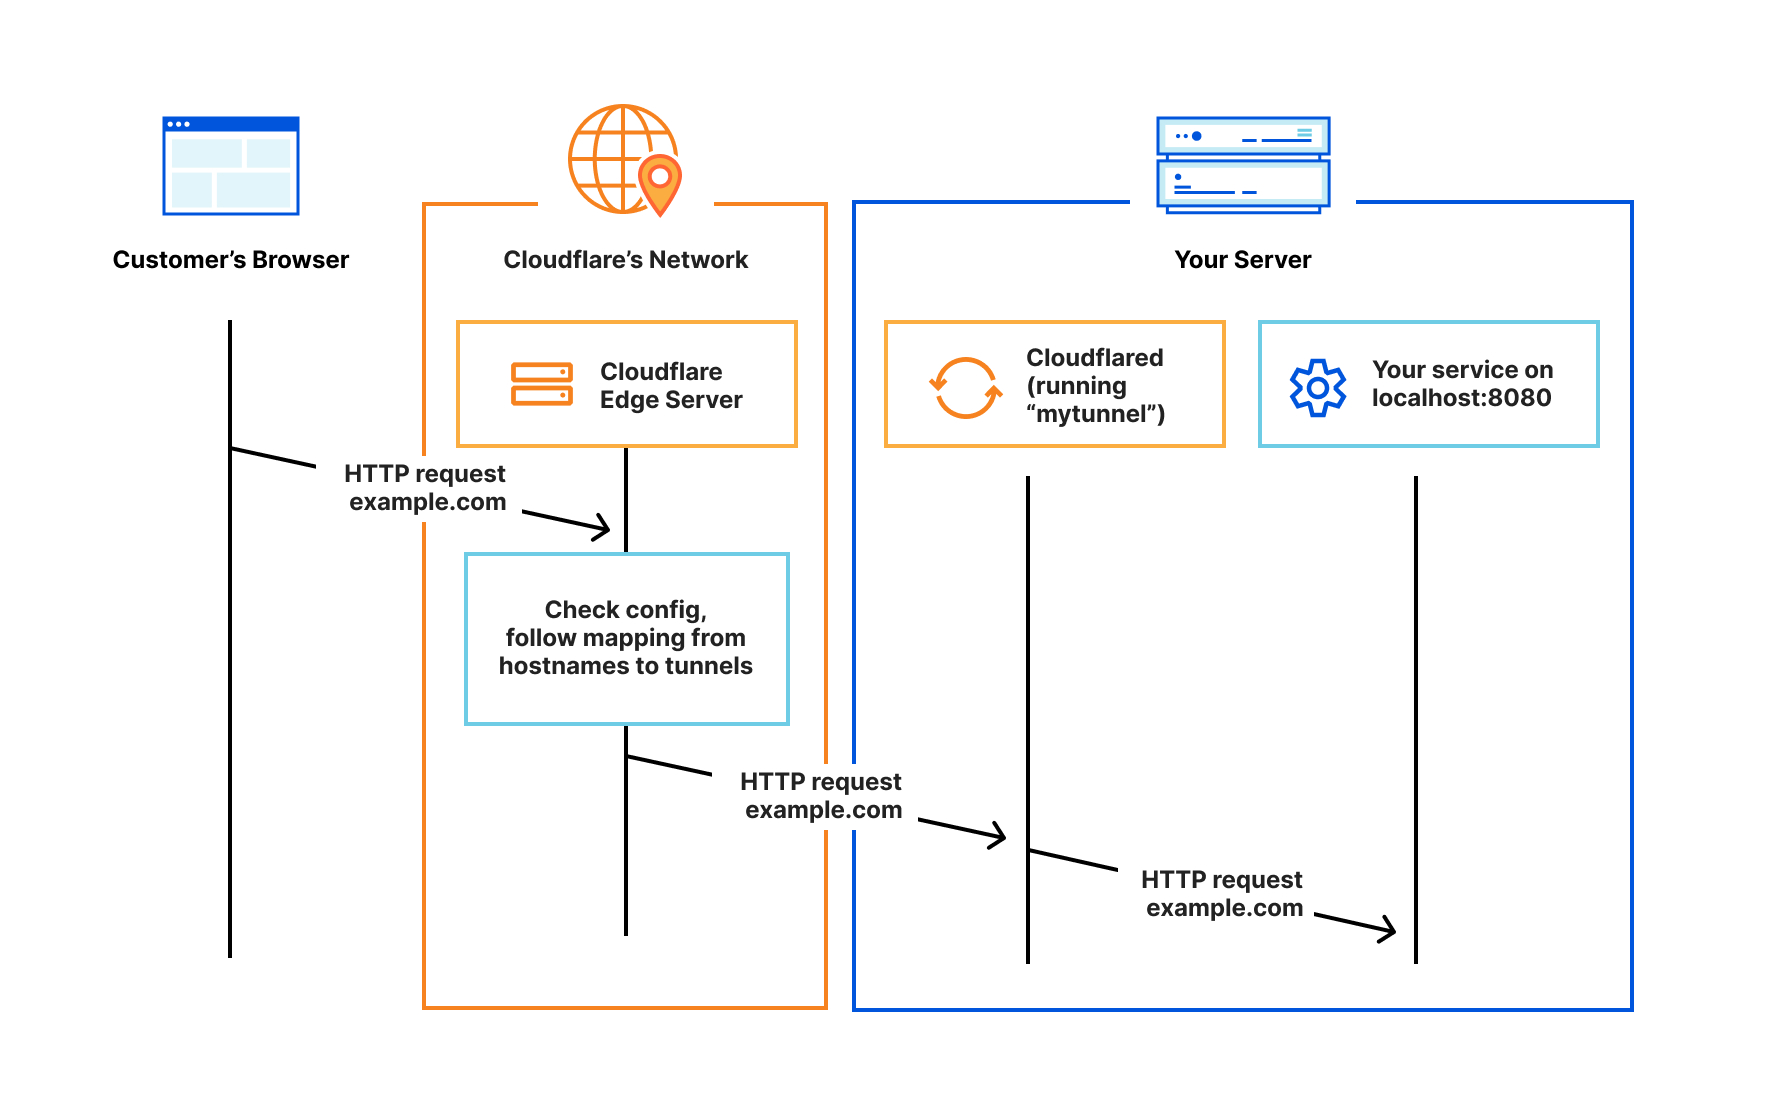
Cloudflare Tunnels work by establishing a secure outbound connection from my origin server to Cloudflare's global network using the cloudflared daemon. This reverse proxy ensures that my server is no longer exposed directly to the internet, thus removing the need for firewall rules, IP whitelisting, or VPNs.
When a user sends a request from their browser to access my website or application, the request is first routed through Cloudflare's network. This offers numerous benefits, including DDoS protection, caching, and SSL encryption. The request is then forwarded to the cloudflared daemon running on my server via the established tunnel.
Here's a step-by-step breakdown of how I set up Cloudflare Tunnels:
- I installed and configured the
cloudflareddaemon on my origin server. - I established a secure outbound connection (the tunnel) from my server to Cloudflare's network.
- I configured my DNS settings in the Cloudflare dashboard to route traffic through the tunnel.
- When a user sends a request to my site, it is first processed by Cloudflare's network.
- The request is forwarded to my server through the secure tunnel, bypassing the need for a public IP address.
By using Cloudflare Tunnels, I've experienced these primary benefits:
- Enhanced security: My origin server is hidden behind Cloudflare's network, protecting it from direct attacks and minimizing the attack surface.
- Simplified network management: I no longer need to worry about firewall rules or IP whitelisting, which reduces administrative overhead and complexity.
- Improved performance: Cloudflare's vast network and caching capabilities help deliver content faster and more efficiently to users worldwide.
- Scalability: I can easily scale my infrastructure with Cloudflare's global network and built-in load balancing.
- Zero Trust architecture: Integration with Cloudflare Access allows for seamless, secure, and granular access control to my applications and resources.
By leveraging Cloudflare's global network and powerful features, I can ensure a safe and fast browsing experience for my users while simplifying network management and enhancing security.
Cloudflare Access
Cloudflare Access is a complementary service to Cloudflare Tunnels, offering a secure and user-friendly solution for managing authentication and authorization for my web applications and resources. By adopting a Zero Trust security model, Cloudflare Access allows me to implement granular access control, ensuring that only authorized users can access specific resources, based on their permissions and authentication credentials.
Here's an overview of how Cloudflare Access works:
- I configure my desired authentication providers (such as Google, Okta, or a custom SAML provider) in the Cloudflare dashboard.
- I create access policies to define which users or groups can access specific resources, based on their email address, role, or other attributes.
- When a user attempts to access a protected resource, Cloudflare Access intercepts the request and prompts the user to authenticate using one of the configured providers.
- After successful authentication, Cloudflare Access evaluates the user's attributes against the access policies I've set up.
- If the user meets the criteria specified in the access policy, they are granted access to the requested resource.
By using Cloudflare Access, I've experienced the following key benefits:
- Simplified authentication and authorization: Cloudflare Access centralizes the management of authentication and authorization, eliminating the need to implement and maintain multiple authentication systems across my applications and resources.
- Enhanced security: The Zero Trust model ensures that every request is authenticated and authorized, reducing the risk of unauthorized access and data breaches.
- Seamless user experience: Users can enjoy a single sign-on (SSO) experience across all protected resources, reducing the need to remember multiple passwords and streamlining the authentication process.
- Granular access control: I can create custom access policies to grant or restrict access based on user attributes, roles, or other criteria, enabling me to maintain precise control over my resources.
- Scalable and flexible: Cloudflare Access easily scales to meet the needs of my growing infrastructure and supports a wide range of authentication providers, allowing me to adapt to changing requirements.
By integrating Cloudflare Access with Cloudflare Tunnels, I've been able to create a comprehensive and secure solution for connecting clients to my origin server and managing access to my resources. This powerful combination of services ensures that my users have a safe, fast, and seamless experience while providing me with the tools to maintain control and visibility over my web infrastructure.
Cloudflare Tunnels for dummies
Think of Cloudflare Tunnels as a secure bridge that connects your computer to a website's server, ensuring that the information you exchange with the website is safe from prying eyes. For someone with limited IT or networking knowledge, it's helpful to understand the basics of how Cloudflare Tunnels work to protect your data and improve your browsing experience.
Here's a simple breakdown of how Cloudflare Tunnels work:
- The website owner sets up a tool called
cloudflaredon their server, which is the computer where their website lives. This tool creates a secure connection (the tunnel) between their server and Cloudflare, a company that helps websites stay safe and load faster. - The website owner also adjusts some settings to tell Cloudflare to send all incoming traffic through the secure tunnel.
- When you want to visit the website, your computer sends a request, like knocking on the door and asking to come in.
- Instead of connecting directly to the website's server, your request goes through Cloudflare's network first. This network helps protect the website from harmful attacks and makes it load faster for you.
- Finally, your request travels through the secure tunnel created by
cloudflaredand reaches the website's server.
By using Cloudflare Tunnels, the website owner ensures that their server is protected from direct attacks, while you, the visitor, get a faster and safer browsing experience. The whole process is like having a secure and efficient messenger service that carries your requests and the website's responses back and forth, making sure everything stays safe and quick.
Zooming in on the network layer of Cloudflare Tunnels
Cloudflare Tunnels not only provide a secure and efficient way to connect clients to my origin server, but they also offer significant advantages at the network layer. By taking a closer look at the network layer of Cloudflare Tunnels, we can better understand how it optimizes connections and improves the overall performance of my web infrastructure.
- Anycast Routing: Cloudflare's global Anycast network plays a crucial role in optimizing the network layer of Cloudflare Tunnels. When a user sends a request, Cloudflare's Anycast network automatically routes the request to the nearest data center, minimizing latency and ensuring optimal performance. The same principle applies to the outbound connection from my origin server to Cloudflare's network, allowing the
cloudflareddaemon to connect to the closest point of presence (PoP). - Load Balancing: Cloudflare Tunnels support built-in load balancing, distributing incoming requests across multiple instances of the
cloudflareddaemon running on my origin server or across different servers. This feature not only improves the resilience and fault tolerance of my infrastructure but also helps me scale my services seamlessly to handle increased traffic. - Connection Resilience: By leveraging the advanced capabilities of the QUIC and HTTP/3 protocols, Cloudflare Tunnels provide a resilient network layer that can withstand packet loss, network congestion, and other challenges often encountered on the internet. These modern protocols enable faster connection establishment, improved congestion control, and enhanced security, resulting in a more stable and responsive user experience.
- Compression and Caching: Cloudflare's network layer also offers intelligent compression and caching mechanisms that further enhance performance. When a user sends a request, Cloudflare automatically compresses the response to minimize the amount of data transferred over the tunnel. Additionally, Cloudflare's caching capabilities store and serve static assets from its edge network, reducing the load on my origin server and ensuring faster content delivery to users.
- Transport Layer Security (TLS): The network layer of Cloudflare Tunnels also ensures that all data transmitted between the client, Cloudflare's network, and my origin server is encrypted using the latest TLS standards. This end-to-end encryption protects sensitive data from eavesdropping, tampering, and other security threats while ensuring compliance with privacy regulations and industry best practices.
Getting started with Cloudflare Tunnels
To get started with Cloudflare Tunnels, you'll need a few things to ensure a smooth setup. Follow these steps, and you'll have a secure and efficient connection between your origin server and Cloudflare's network in no time.
What you'll need:
- A Cloudflare account: If you don't already have one, sign up for a free account at https://cloudflare.com.
- A registered domain: You'll need a domain name that you own or control to configure DNS settings.
- An origin server: This is where your website or application is hosted. Make sure you have administrative access to this server.
Now I will present you with a way to get started. I am taking the command-line approach, but you can find a tutorial from Cloudflare on how to do this using the dashboard here: https://developers.cloudflare.com/cloudflare-one/connections/connect-apps/install-and-setup/tunnel-guide/
Step-by-step guide to getting started:
Step 1
Add your domain to Cloudflare: Log in to your Cloudflare account, and follow the instructions to add your domain. You'll need to update your domain's nameservers to point to Cloudflare's nameservers. This process may take some time, depending on your domain registrar.
Step 2
Install cloudflared: Download and install the cloudflared daemon on your origin server. You can find the installation instructions for your specific operating system in the official documentation.
Step 3
Authenticate cloudflared: Authenticate the cloudflared daemon with your Cloudflare account by running the following command in your server's command line interface:
cloudflared tunnel loginThis command will open a browser window, prompting you to log in to your Cloudflare account and select the domain you want to use. Once you've successfully authenticated, a certificate file will be downloaded to your server.
Step 4
Create a tunnel: Run the following command to create a new Cloudflare Tunnel:
cloudflared tunnel create [TUNNEL_NAME]Replace [TUNNEL_NAME] with a name of your choice for the tunnel. This command will generate a unique Tunnel ID.
Step 5
Configure the tunnel: Create a configuration file for cloudflared (usually named config.yml). In this file, specify the tunnel's details, including the Tunnel ID, the path to the certificate file, and the address of your local web server. An example configuration looks like this:
tunnel: [TUNNEL_ID]
credentials-file: /path/to/your/cert/file
ingress:
  - hostname: example.com
    service: http://localhost:80
  - service: http_status:404
Replace [TUNNEL_ID] with the ID generated in step 4, and adjust the file path and local web server address as needed.
Step 6
Start the tunnel: Run the following command to start the cloudflared daemon and establish the tunnel connection:
cloudflared tunnel run
Optionally, you can specify the configuration file if it's not located in the default directory:
cloudflared tunnel --config /path/to/config.yml run
Step 7
Update your DNS settings: Log in to your Cloudflare dashboard and navigate to the DNS settings for your domain. Add a new DNS record (usually an "A" or "CNAME" record) that points your domain or subdomain to the Cloudflare Tunnel. Set the content of the record to the Tunnel ID, followed by .cfargotunnel.com. For example, if your Tunnel ID is example_tunnel, the content would be example_tunnel.cfargotunnel.com.
Once you've completed these steps, your Cloudflare Tunnel will be active, securely connecting your origin server to Cloudflare's network. Now, all incoming traffic to your domain will be routed through Cloudflare's network, providing DDoS protection, caching, and SSL encryption before reaching your server via the secure tunnel.
Getting Started with Cloudflare Access
internet by providing an authentication layer that uses your existing identity providers to control access to your applications. In this guide, we'll walk you through the process of setting up Cloudflare Access for your applications.
Step 1: Add your application
- Log in to your Cloudflare account and navigate to Zero Trust > Access > Applications.
- Click "Add an application" and select "Self-hosted."
- You can now start configuring your app by choosing an application name and setting a session duration. The session duration determines how frequently users will be prompted to authenticate with the configured provider. To prompt users every time they access your application, select "No duration, expires immediately."
- From the drop-down menu under "Application domain," select a hostname that represents the application. The hostname must be an active zone in your Cloudflare account. You can use wildcards to protect multiple parts of an application sharing a root path.
- Scroll down to the "Application visibility" card. Toggle on "Show application in the App Launcher" if you want the application to be visible in the App Launcher. This setting does not impact users' ability to reach the application. Users without access to the application will not see it in the App Launcher regardless of whether the toggle is enabled. Users with access to the application will still be able to reach it with a direct link.
- (Optional) Add a custom logo for your application by clicking "Custom" and entering a link to your desired image. Ensure the image is served from an HTTPS endpoint.
- Scroll down to the "Identity Providers" card and select the identity providers you want to enable for your app. Turn on "Instant Auth" if you're selecting only one login method for your application and want your end users to skip the identity provider selection step.
- Click "Next."
Step 2: Add a policy
- You can now configure a policy to control who can access your app. To learn more about how policies work, read the Policies section.
- Specify a name for your rule (mandatory), a policy action, and one or more rules in the "Configure a rule" box. You can add as many include, exception, or require statements as needed.
- Click "Next" to add your application to Access.
Step 3: Advanced settings
- The "Setup" section allows you to configure advanced settings for your application, such as Cross-Origin Resource Sharing (CORS) settings, cookie settings, and cloudflared settings. For more information, read about session management and automatic cloudflared authentication.
- Once you have configured the settings as needed, click "Add application."
After completing these steps, your application will be available in Cloudflare Access and will appear in your "Applications" list. You can proceed with connecting your origin to Cloudflare using this address. Make sure you create Access policies before connecting your application to Cloudflare. To connect your origin to Cloudflare, you can use Cloudflare Tunnel. If you do not wish to use Cloudflare Tunnel, you must validate the token issued by Cloudflare on your origin.
Conclusion
In conclusion, Cloudflare Tunnels and Cloudflare Access offer a powerful and secure way to publish your internal applications and tools to the internet while maintaining granular access control. By following the steps outlined in this blog post, you can leverage these Cloudflare features to enhance your web infrastructure's security, performance, and user experience.
For more detailed information and guidance, you can refer to Cloudflare's official documentation:
If you have any questions or need further assistance, don't hesitate to reach out to Cloudflare's support resources, engage with the Cloudflare community or ask questions here. By exploring these powerful features, you can take your web application security and performance to the next level.