From Zero to Hero: Playwright Web Automation
Explore and master Playwright with our comprehensive guide! From basics to advanced features like screenshot comparisons and network request mocking, this interactive tutorial offers structured, hands-on learning for all levels. Enhance your automation testing skills with Playwright now!


Welcome! I am thrilled to present this comprehensive and interactive Playwright tutorial designed to take you on a learning journey from the foundational basics to advanced mastery. Whether you are new to Playwright or seeking to deepen your knowledge and expertise, this tutorial is crafted with a range of interactive elements and exercises aimed at providing a rich, hands-on learning experience.
Disclaimer: This tutorial is authored by me, Jonas Claes, in my individual capacity. While I am employed at the time of writing by Resillion, the views, thoughts, and opinions expressed in this post are solely my own and do not necessarily reflect the official policy, position, or opinions of Resillion. This tutorial is meant as a helpful resource for individuals interested in learning about Playwright and its features, and any feedback or opinions are welcomed and appreciated. The content provided is intended for informational purposes only and should be used at your own discretion.
Table of contents
You can use the table of contents below to quickly navigate around the document, as this tutorial is packed with content.
- Introduction
- Foundations of Playwright
- Practical Understanding of Locators
- Visual Studio Code Integration
- Network Request Mocking
- Screenshot Comparisons
- Techniques
- Conclusion and Next Steps
Introduction
The objective of this tutorial is to offer a structured and immersive learning path. By the end of this journey, you will be well-versed in the myriad of features Playwright offers, such as screenshot comparisons, network request mocking, advanced configurations, and much more. You will gain practical insights and skills, empowering you to leverage Playwright's capabilities effectively in your projects.
Why Playwright?
Playwright is a powerful, feature-rich automation library for browser and API testing. Its versatility makes it a valuable tool for developers, testers, and automation enthusiasts seeking to perform end-to-end testing, component testing, capture screenshots, interact with web elements, and much more, across different browsers.
Playwright Test was created specifically to accommodate the needs of end-to-end testing. Playwright supports all modern rendering engines including Chromium, WebKit, and Firefox. Test on Windows, Linux, and macOS, locally or on CI, headless or headed with native mobile emulation of Google Chrome for Android and Mobile Safari.
https://playwright.dev/docs/intro
Learning Approach
This tutorial adopts a scaffolded learning approach, ensuring each new concept builds logically upon the last. We start with foundational concepts, offering a clear understanding of Playwright's core components, such as test suites, modules, tests, and steps. Gradually, we will delve deeper into more complex and advanced features, offering practical exercises, challenges, and interactive elements at each step. The focus is on learning by doing, ensuring you gain practical experience and immediate application of the concepts learned.
Foundations of Playwright
This is the first stepping stone in our Playwright journey! In this section, we will lay the groundwork by exploring the fundamental concepts and components of Playwright. Understanding these foundational elements is crucial as it sets the stage for more advanced topics we will delve into in the later sections.
Quick Start
Before we delve into the core concepts, let's get started by setting up Playwright in a simple, quick-start guide. This will include installing Playwright and creating a basic script to understand its working mechanism. By the end of the quick start, you'll have a running Playwright script and a glimpse of what's to come in the subsequent sections.
There are two main variants on how to use Playwright, as a library and as a test runner.
Noteworthy: https://playwright.dev/docs/intro
Prerequisites
In order to interactively follow the exercises in this tutorial, please make sure you have the following tools installed:
- NodeJS (at least v18)
https://nodejs.org/en/download/ - Visual Studio Code
https://code.visualstudio.com/download
Playwright as a library
Create a directory in which you will be working. Next, open your IDE (preferably VS Code) in this folder and open a new terminal.
Installing Playwright into your working directory is as straightforward as running the following command:
npm i --save playwrightNext, we will write a script that opens a chromium browser, navigates to a specific page, takes a screenshot, and exits cleanly. I've written this in index.cjs.
const { chromium } = require("playwright");

(async () => {
  const browser = await chromium.launch({ headless: false });
  const page = await browser.newPage();
  await page.goto("https://jonasclaes.be");
  await page.screenshot({ path: `screenshots/example.png` });
  await browser.close();
})();
You can run this example with the following command:
node ./index.cjsA new chromium browser should open, navigate to https://jonasclaes.be and take a screenshot. Afterwards you should find this screenshot in your filesystem under screenshots/example.png.
You can find this example in the GitHub repository in the example/quick-start branch.
 jonasclaes
Nice! You've successfully started a browser and taken a screenshot using Playwright web automation!
Playwright as a test runner
Create a directory in which you will be working. Next, open your IDE (preferable VS Code) in this folder and open a new terminal.
Installing the whole Playwright Testing Framework into your working directory is as straightforward as running the following command:
npm init playwright@latestYou will now be guided through creating a project. I would like to recommend you enable the same options as I did if you will be following this tutorial.
Need to install the following packages:
  create-playwright@1.17.130
Ok to proceed? (y)
Getting started with writing end-to-end tests with Playwright:
Initializing project in '.'
√ Do you want to use TypeScript or JavaScript? · TypeScript
√ Where to put your end-to-end tests? · tests
√ Add a GitHub Actions workflow? (y/N) · false
√ Install Playwright browsers (can be done manually via 'npx playwright install')? (Y/n) · true
Initializing NPM project (npm init -y)…
Wrote to C:\workspace\jonasclaes\2023-tutorial-zero-to-hero-playwright\package.json:

{
  "name": "2023-tutorial-zero-to-hero-playwright",
  "version": "1.0.0",
  "description": "From Zero to Hero: Playwright Web Automation",
  "main": "index.js",
  "scripts": {
    "test": "echo \"Error: no test specified\" && exit 1"
  },
  "keywords": [],
  "author": "",
  "license": "ISC"
}


Installing Playwright Test (npm install --save-dev @playwright/test)…

added 3 packages, and audited 4 packages in 2s

found 0 vulnerabilities
Installing Types (npm install --save-dev @types/node)…

added 1 package, and audited 5 packages in 987ms

found 0 vulnerabilities
Downloading browsers (npx playwright install)…
Writing playwright.config.ts.
Writing tests\example.spec.ts.
Writing tests-examples\demo-todo-app.spec.ts.
Writing package.json.
✔ Success! Created a Playwright Test project at C:\workspace\jonasclaes\2023-tutorial-zero-to-hero-playwright

Inside that directory, you can run several commands:

  npx playwright test
    Runs the end-to-end tests.

  npx playwright test --ui
    Starts the interactive UI mode.

  npx playwright test --project=chromium
    Runs the tests only on Desktop Chrome.

  npx playwright test example
    Runs the tests in a specific file.

  npx playwright test --debug
    Runs the tests in debug mode.

  npx playwright codegen
    Auto generate tests with Codegen.

We suggest that you begin by typing:

    npx playwright test

And check out the following files:
  - .\tests\example.spec.ts - Example end-to-end test
  - .\tests-examples\demo-todo-app.spec.ts - Demo Todo App end-to-end tests
  - .\playwright.config.ts - Playwright Test configuration

Visit https://playwright.dev/docs/intro for more information. ✨

Happy hacking! 🎭
You should now have a directory structure that looks like this:
2023-tutorial-zero-to-hero-playwright
├── package-lock.json
├── package.json
├── playwright.config.ts
├── tests
│   └── example.spec.ts
└── tests-examples
    └── demo-todo-app.spec.ts
There are some example tests already defined. Start with the tests/example.spec.ts file. Try to understand the layout and the architecture of the framework. We will go into this deeper in a subsequent section.
To run the tests, execute the following command:
# To run the tests/example.spec.ts file, run:
npx playwright test
To run the tests-examples/demo-todo-app.spec.ts tests, you will need to move this file to the tests/ folder. By default, the Playwright configuration is set to only execute tests located under the tests/ directory.
You can find this example in the GitHub repository in the example/quick-start-test-runner branch.
jonasclaesPlease see the "Writing tests" page on the official Playwright docs to find more information:
Congratulations! You've successfully set up a new Playwright project and ran tests!
Core Concepts of Playwright
In this section I will unravel the essence of Playwright by exploring its fundamental building blocks: test suites, modules, tests, and steps. Gaining a good grasp of these concepts is crucial to building effective and efficient Playwright scripts.
Test Step
Steps in Playwright are the sequences of actions or commands within a test. Each step represents a specific interaction with the web application, such as clicking a button, filling a form, or navigating to a page. Steps are the smallest units in the testing hierarchy and serve as the building blocks for creating tests. A test step must always be located inside of a test.
You can use test steps to add structure to your code and your results.
A test step can be defined as follows:
import { test } from "@playwright/test";

await test.step('Your step name goes here', async ({}) => {
  // Your actions and assertions go here
})
Test
Tests are the individual units of testing in Playwright. Each test represents a single functionality or feature to be verified. It's within these tests that we write scripts to interact with the web application, check the responses, and validate the results.
A test can be defined without any other context but may also be defined inside of a test suite.
A test can be defined as follows:
import { test } from "@playwright/test";

test('Your test name goes here', async ({ page }) => {
  // Your test steps go here
})
Test Suites
A test suite combines multiple tests into a group. It’s like a container holding various tests related to a specific feature or a set of features, enabling organized and structured testing. This organization helps in managing and maintaining tests, especially in larger projects.
A test suite can be defined as follows:
import { test } from "@playwright/test";

test.describe('Your group name goes here', () => {
  // Your tests go here
})
Test Modules
Modules in Playwright refer to individual JavaScript or TypeScript .spec files containing one or more tests. They are units of organizing test scripts, allowing you to group related tests together logically. A well-structured module can significantly enhance the readability and maintainability of your test code.
Example test module
This is an example of a test module. Try to identify the test suite, the tests, and the test steps in the example below.
import { test } from "@playwright/test";

test.describe("Authentication", () => {
  test("As a user, I can login with valid credentials", async ({ page }) => {
    await test.step("Go to login page", async () => {});
    await test.step("Enter email", async () => {});
    await test.step("Enter password", async () => {});
    await test.step("Click Sign-in button", async () => {});
  });

  test("As a user, I cannot login with invalid credentials", async ({
    page,
  }) => {
    await test.step("Go to login page", async () => {});
    await test.step("Enter email", async () => {});
    await test.step("Enter password", async () => {});
    await test.step("Click Sign-in button", async () => {});
  });
});
You can find this file in the GitHub repository in the example/test-module branch, in the tests/example.spec.ts file.
jonasclaesConfiguration and Project Setup
In this section we'll explore the configuration file that Playwright provides and how we can customize this to our needs.
Configuration file
All of Playwright's configuration is stored in the playwright.config.js or playwright.config.ts file.
When Playwright launches, it reads this configuration file, and sets some internal state, which will be used when running tests. With this file we can define several projects, which can mean anything you like. For example, a project can be a different browser, but it could also be your API instead of your Front-end.
It also contains more generalized options that will be reused across all the tests, like parallelism, retries, reporting, ....
Projects
A project is a specific configuration, which can be named. The naming of this is up to you. A configuration can hold any of the following items:
- Devices (pre-configured profiles)
- Tracing
- URLs
- Credentials
- HTTP Headers
- Timeouts
- Network configuration
- Service workers
- Timezone
- ...
You can find a full list of supported options here:
Typically, you would have a couple of projects.
- One per browser
- Chromium
- Firefox
- Safari
- ...
- Logged in state (for reuse of authenticated session)
- Logged in
- Logged out
- API
- ...
In the example below, I've pasted an excerpt from an existing configuration that I use.
/* Configure projects for major browsers */
projects: [
  {
    name: 'chromium',
    use: { ...devices['Desktop Chrome'] },
  },
  {
    name: 'firefox',
    use: { ...devices['Desktop Firefox'] },
  },
  {
    name: 'webkit',
    use: { ...devices['Desktop Safari'] },
  },
],
This will run all the tests across 3 browsers.
Reporting
The configuration file has a specific option called reporter. The name would imply that you can only have one, however that is not correct. You can have as many reporters as you like.
Default reporter
By default, Playwright will setup a html reporter. This will generate a HTML report after each test run, which is located in playwright-report/index.html. If you open this file in a web browser, you will be greeted by a nice interactive page, containing the results from your latest test run.
If you make use of tracing, you will need to open the report a little bit differently. Run the following command to spin up a local web server and serve the report:
npx playwright show-reportThis command should automatically open your browser once it's ready. If it does not automatically open a browser, navigate to the URL shown in the output.
Built-in reporters
Playwright includes the following built-in reporters:
- List
It prints a line for each test being run. - Line
It's more concise than the list reporter. It uses a single line to report last finished test and prints failures when they occur. - Dot
It's more concise than the line reporter. It only produces a single character per successful test run. It is the default on CI and useful where you don't want a lot of output. - HTML
It produces a self-contained folder that contains a report for the test run that can be served as a web page. - Blob
It produces a raw data dump of all the details about the test run and can be used later to produce any other report. Their primary function is to facilitate merging of reports from sharded tests. - JSON
Produces an object with all information about the test run in the JSON format. - JUnit
Produces a JUnit-style XML report. - GitHub
Provides automatic failure annotations for GitHub Actions.
For in-depth configuration, head to the following page:
Extensibility
Custom reporters can be used in combination with Playwright. You can also build your own reporter, by following the instructions in the official documentation. You can find some of these custom reporters here:
Testmo
For example, if you want to make use of the Testmo reporter, you should follow the steps defined by the author of the reporter. Usually this will be located in the NPM package README, or in the GitHub README file, like this one:


When you have installed the reporter, and ran the tests, a new folder called testmo should appear, containing a testmo.xml file.
You can find this example in the GitHub repository in the example/testmo-reporter branch, in the playwright.config.ts file.
jonasclaesPractical Understanding of Locators
Basics of Locators
Playwright's locators are a core feature designed to streamline the interaction with web elements during automated testing. They encapsulate the logic necessary to retrieve elements, making your tests more readable and robust, especially in the face of a dynamically changing DOM. Here's an overview of the web-first locators provided by Playwright:
page.getByRole(): This locator allows you to find elements based on their explicit or implicit accessibility attributes. It reflects how users and assistive technology perceive the page, thus promoting accessibility-aware testing.page.getByText(): This function enables you to locate elements based on their text content, making it intuitive and straightforward for cases where the text on the element is known.page.getByLabel(): Use this locator to find form controls based on the text of their associated labels. It's a handy function when dealing with forms and input fields.page.getByPlaceholder(): This locator helps you find input elements based on their placeholder text, which can be particularly useful in form-heavy pages.page.getByAltText(): Primarily used for locating images based on their text alternative, promoting accessibility while also providing a means to interact with image elements in your tests.page.getByTitle(): Locate elements based on their title attribute, providing a more semantic way to interact with elements that have descriptive titles.page.getByTestId(): This function allows for locating elements based on theirdata-testidattribute, which can be a practical approach in projects wheredata-testidattributes are used for testing purposes.
These web-first locators prioritize user-visible attributes and explicit contracts over more fragile, implementation-dependent details like CSS selectors or XPaths.
You can find some of these locators being used in the example in the GitHub repository in the example/quick-start-test-runner branch, in the tests-examples/demo-todo-app.spec.ts file.
Advanced Locator Strategies
As you venture into more complex testing scenarios, understanding and leveraging advanced locator strategies become indispensable. Playwright offers a variety of advanced locator strategies that extend beyond the basics, enabling more precise interactions with web elements, especially in complex or dynamic pages.
XPath and CSS Locators
While Playwright supports XPath and CSS locators, they are not the first choice due to their reliance on DOM structure. Making use of these selectors will often lead to fragile tests which are inherently flawed.
// Using a CSS Selector
const cssLocator = page.locator('.your-css-selector');

// Using an XPath
const xpathLocator = page.locator('xpath=//your-xpath');
Filtering Locators
Filtering locators allow for more precise targeting by filtering based on text, absence of text, or presence/absence of specific child elements.
// Get an element by data-testid and filter for an element containing the text "John Doe"
const filteredLocator = page.getByTestId('table-users-rows').filter({ hasText: 'John Doe' });
Matching Locators and Lists
Playwright supports matching multiple elements, which can be utilized to work efficiently with lists of elements on a page.
const items = page.locator('.list-item');
const count = await items.count();
Chaining
Chaining methods that create a locator, like page.getByText() or locator.getByRole(), help narrow down the search to a particular part of the page, providing more control in locating elements.
// Chaining two locators together
const dualChainedLocator = page.locator('.list').locator('.item');

// Chaining three locators together
const tripleChainedLocator = page.locator('.list').locator('.item').getByText('Example');
Visual Studio Code Integration
The Visual Studio Code plugin for Playwright is designed to improve your testing workflow. It offers features like smart code navigation, autocompletion for Playwright APIs, debugging capabilities, and recording capabilities. By utilizing this plugin, you can enhance your productivity, easily manage and debug your Playwright scripts, and have a more intuitive and supported environment for writing tests with Playwright.
Here is a short list of the features the extension offers:
- Install Playwright
- Run tests with a single click
- Run multiple tests
- Show browsers
- Pick locators
- Debug step-by-step, explore locators
- Tune locators
- Record new tests
- Record at cursor
Installing the VS Code Plugin
The first step towards integrating Playwright with Visual Studio Code is installing the Playwright extension. Here's a step-by-step walkthrough:
- Open Visual Studio Code.
- Press
Ctrl+Shift+X, this will open the extensions panel. - Enter the following extension ID in the search field:
ms-playwright.playwright. - Install the
Playwright Test for VSCodeextension.
Install Playwright
If you don't have the Playwright NPM package installed in your project, or if you are starting with a new testing project, the "Install Playwright" action from the command panel (Ctrl + Shift + P) will help you get started.
Pick the browsers you'd like to use by default, don't worry, you'll be able to change them later to add or configure the browsers used. You can also choose to add a GitHub Action so that you can easily run tests on Continuous Integration on every pull request or push.
The extension automatically detects if you have Playwright installed and loads the browsers, known as Playwright projects, into Visual Studio Code. By default it will select the first project as a run profile. Inside the test explorer in VS Code you can change this behaviour to run a single test in multiple or different browsers.
Run tests with a single click
Click the green triangle next to the test you want to run. You can also run the test from the testing sidebar by clicking the grey triangle next to the test name.
Run multiple tests
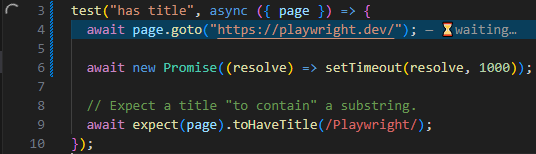
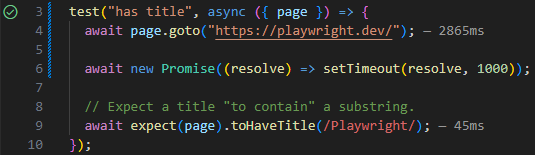
You can use the Testing sidebar to run a single test or a group of tests with a single click. While tests are running, the execution line is highlighted. Once the line has completed, the duration of each step of the test is shown.
Show browsers
Check the "show browsers" checkbox to run tests with the browser open so that you can visually see what is happening while your test is running. Click on "close all browsers" to close the browsers.
Pick locators
Click the "pick locator" button and hover over the browser to see the locators available. Clicking an element will store it in the locators box in VS Code. Pressing enter will save it to the clip board so you can easily paste it into your code or press the escape key to cancel.
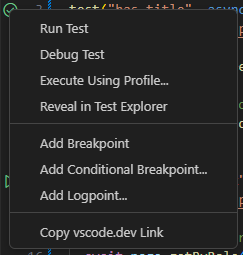
Debug step-by-step, explore locators
Right click the green triangle next to the test you want to debug and click "Debug test". Set a breakpoint and hover over a value. When your cursor is on some Playwright action or a locator, the corresponding element (or elements) are highlighted in the browser.
Tune locators
You can edit the source code to fine-tune locators while on a breakpoint. Test out different locators and see them highlighted in the browser.
Record new tests
Record new tests by clicking on the "record tests" button in the testing sidebar. This will open a browser window where you can navigate to a URL and perform actions on the page which will be recorded to a new test file in VS Code.
Record at cursor
This generates actions into the existing test at the current cursor position. You can run the test, position the cursor at the end of the test and continue generating the test.
Network Request Mocking
This section lays the foundation for understanding network request mocking in automated testing. By diving into the core concepts and practical applications of mocking network requests, you will grasp how to simulate network interactions, enabling more controlled and reliable testing scenarios. Whether it's to isolate tests from external dependencies or to replicate various network conditions, mastering network request mocking is pivotal for developing robust test suites. Through hands-on exercises and interactive discussions, we'll embark on a journey to uncover the essentials of network request mocking, setting the stage for more advanced explorations in the following sections.
Fundamentals of Network Request Mocking
Network mocking in Playwright involves intercepting network requests and responses to simulate various network conditions and server behaviours. This is achieved using the route.fulfill() method to provide custom responses, or route.continue() to modify requests before they reach the server. By mocking network interactions, you can test how your application behaves under different scenarios without relying on external servers or conditions. This feature is crucial for testing error handling, loading states, and other UI behaviours related to network activity.
Web APIs are usually implemented as HTTP endpoints. Playwright provides APIs to mock and modify network traffic, both HTTP and HTTPS. Any requests that a page does, including XHRs and fetch requests, can be tracked, modified and mocked. With Playwright you can also mock using HAR files that contain multiple network requests made by the page.
https://playwright.dev/docs/mock
Network Mocking Techniques
In this section, we delve into various techniques of network mocking in Playwright, which is a crucial aspect of testing in modern web applications. By simulating different network scenarios, from handling typical requests and responses, to manipulating headers and routing, we can ensure our application behaves correctly under different network conditions. The following techniques provide a means to simulate, control, and analyse network interactions during testing, paving the way for robust and reliable tests. Through hands-on exercises, we'll explore how to implement these techniques in Playwright, enhancing our testing capabilities.
Basic Request and Response Mocking
Concept and Importance
Basic request and response mocking is crucial for simulating server interactions, ensuring your application behaves correctly without reliance on external servers. It's essential for testing error handling, loading states, and other network-dependent behaviours.
Code Examples and Exercises
// Example: Mocking a GET request
await page.route('https://example.com/data', route => {
  route.fulfill({
    status: 200,
    contentType: 'application/json',
    body: JSON.stringify({ key: 'value' })
  });
});

// Exercise: Mock a POST request and verify the mocked response
Dynamic Response Mocking
Explanation and Use Cases
Dynamic response mocking enables varying mocked responses based on request data, testing how the application handles different server responses.
Code Snippets and Practice Exercises
// Example: Dynamic mocking based on request data
await page.route('https://example.com/data', (route, request) => {
  const postData = request.postData();
  route.fulfill({
    status: 200,
    contentType: 'application/json',
    body: postData ? JSON.stringify({ response: 'data received' }) : JSON.stringify({ error: 'no data' })
  });
});

// Exercise: Mock a request dynamically based on a query parameter
Error Simulation
Definition and Significance
Error simulation involves mocking network errors to test application resilience and error handling mechanisms.
Code Examples and Exercises
// Example: Simulating a network error
await page.route('https://example.com/data', route => {
  route.abort('failed');
});

// Exercise: Simulate a timeout error and observe how your application handles it
Header Manipulation
Concept and Importance
Header manipulation involves altering request or response headers to test application behaviour under various server-client interactions.
Code Snippets and Practice Exercises
// Example: Modifying a request header
await page.route('https://example.com/data', route => {
  route.on('request', request => {
    const headers = Object.assign({}, request.headers(), {
      'new-header': 'new-value'
    });
    request.continue({ headers });
  });
});

// Exercise: Modify a response header and verify the behavior of your application
API reverse engineering techniques
In this section, we'll delve into a methodical approach to reverse-engineering an API response using Chrome DevTools, followed by crafting mocks via the Builder pattern in TypeScript. This methodology shines when dealing with intricate nested JSON responses, enabling their dissection into smaller, logical entities, such as items within a cart, making the data structure more manageable and mimicable.
Inspecting the API Response
- Launch Chrome, navigate to a page initiating an API call, a good example to get started on would be https://httpbin.org/get.
- Right-click anywhere on the page, select "Inspect" to open DevTools.
- Transition to the "Network" tab, refresh the page to log the network requests.
- Locate and click on the desired API request, switch to the "Response" tab to view the raw JSON response.
Dissecting the Response
- Scrutinize the JSON response to grasp its structure and the relationships among various data entities.
- For instance, a JSON response representing a shopping cart with multiple items can be divided into two primary logical entities:
CartandItem. - Document the structure and data types for various segments of the response as a blueprint for your mocks. This step is important later on.
Implementing the Builder Pattern
The builder pattern is one of the design patterns that works really well for mocking API responses. We can use it as follows:
- Create a builder class for each logical entity identified, like
CartBuilderandItemBuilder. - Introduce a
withDefaults()method in each builder to supply a default set of values for object creation. - Ensure that your builder classes have methods to set values for all fields corresponding to the API response segments.
Here you can see an example of an ItemBuilder:
class ItemBuilder {
    private name: string = "";
    private price: number = 0.0;

    withDefaults(): this {
        this.name = "default name";
        this.price = 10.0;
        return this;
    }

    withName(name: string): this {
        this.name = name;
        return this;
    }

    withPrice(price: number): this {
        this.price = price;
        return this;
    }

    build(): Item {
        return new Item(this.name, this.price);
    }
}
For more information on design patterns, I would like to refer you to the following resource:


Creating Mocks
- Utilize the builders to create mock objects mirroring the structure and data of the actual API response.
- These mocks can now be employed in your tests to simulate API interactions sans actual network requests.
Here you can see an example on how to use the builder:
class Mocks {
    static createMockCart(): Cart {
        const item1 = new ItemBuilder()
          .withDefaults()
          .withName("Item 1")
          .withPrice(10.0)
          .build();
        const item2 = new ItemBuilder()
          .withDefaults()
          .withName("Item 2")
          .withPrice(15.0)
          .build();
        const cart = new CartBuilder()
          .withDefaults()
          .addItem(item1)
          .addItem(item2)
          .build();
        return cart;
    }
}
You could also add a method to the CartBuilder that builds a default cart with 2 items. This has the benefit that your code becomes smaller in your tests. It does however increase the dependencies between code.
By following the aforementioned steps, you've dissected a complex API response, comprehended its structure, and constructed useful mocks using the builder pattern in TypeScript. This modular, readable, and maintainable approach facilitates handling complex data structures in your tests efficiently.
HAR files
A HAR (HTTP Archive) file is a JSON formatted log of network requests and responses. It captures all network interactions, such as HTTP requests and responses, that occur when a page is loaded in the browser. This includes the URLs requested, the HTTP methods used, headers, cookies, and other information about the requests and responses. HAR files can be invaluable for debugging network issues, analysing performance, or replaying a sequence of network interactions in a controlled environment for testing purposes.
To record and replay network interactions using Playwright and HAR files, follow these steps:
- Recording HAR File:
- Use
page.routeFromHAR()orbrowserContext.routeFromHAR()with the path to the HAR file and optionally specify a URL pattern to filter requests. - Set the
updateoption totrueto populate the HAR file with actual network data. - Navigate to the page and perform interactions to capture network requests.
- Use
- Modifying HAR File (Optional):
- Open and edit the hashed
.txtfile in yourhars/folder to modify the HAR data as needed.
- Open and edit the hashed
- Replaying from HAR:
- Utilize
page.routeFromHAR()again, this time with update set to false, to serve responses from the HAR file during your tests, effectively mocking the network interactions.
- Utilize
For more information, see the following page:
Screenshot Comparisons
Introduction to Screenshot Comparisons
Screenshot comparisons are an integral part of visual regression testing. They help in identifying unintentional UI changes by comparing the current state of the UI with a previously captured baseline screenshot. Playwright provides the ability to automate this process, making it easier to integrate into the testing workflow.
Perfecting Screenshot Comparisons
In order to perfect screenshot comparisons using Playwright, the following steps and considerations are essential:
- Capturing Baseline Screenshots:
Utilize theawait expect(page).toHaveScreenshot()method in Playwright to capture baseline screenshots during the first execution of your test. This method will generate reference screenshots that will be used for comparisons in subsequent test runs. - Organizing Baseline Screenshots:
Maintain a well-structured directory for storing baseline screenshots. Playwright saves screenshots in a folder named with the pattern<test-file-name>-snapshots. It's crucial to have an organized storage system to easily manage and retrieve baseline screenshots. - Naming Conventions:
Employ clear naming conventions for your screenshots to easily identify them. By default, Playwright generates names for the screenshots, but you can specify custom names usingawait expect(page).toHaveScreenshot('custom-name.png'). - Handling Platform Variance:
Be aware that screenshots may vary between different browsers and platforms due to rendering differences. If you are testing across multiple platforms, ensure you have baseline screenshots for each platform. - Updating Baseline Screenshots:
When the UI changes, update the baseline screenshots using the--update-snapshotsflag with Playwright test command, like so:npx playwright test --update-snapshots. - Setting a Pixel Difference Threshold:
In some cases, minor pixel differences might not be significant. Set a threshold for pixel differences using themaxDiffPixelsoption. For example,await expect(page).toHaveScreenshot({ maxDiffPixels: 100 })will only flag differences if more than 100 pixels are different. - Sharing Configuration:
If you wish to share a common configuration for screenshot comparisons across tests, specify the default values in theplaywright.config.tsfile. This way, you can centralize the configuration for thetoHaveScreenshotmethod.
By adhering to these guidelines and leveraging the features provided by Playwright, you can greatly enhance the effectiveness and accuracy of screenshot comparisons in your visual regression testing workflow.
For more information, see the following page:
Techniques
Pro Tips and Best Practices
In this section, you will learn some best practices for Playwright.
Integrating Playwright into CI/CD
Seamless integration of Playwright into your CI/CD pipeline ensures that visual testing is an integral part of the development and deployment process. This integration enables timely detection and fixing of visual regressions.
Web-first Locators
Web-first locators are a principle in automated testing that emphasizes the importance of reliable and robust locators for interacting with web elements during tests. They form the foundation upon which all interactions in your automated tests are built.
Importance of web-first locators
- Robustness
Web-first locators contribute to the robustness of your test suite. By ensuring that your locators are precise and reliable, you reduce the likelihood of flaky tests caused by elements not being found or interacted with correctly. - Maintainability
Tests need to be maintainable. A well-structured locator strategy makes your tests easier to update and maintain. When locators are thoughtfully crafted and organized, updating tests due to UI changes becomes a straightforward task. - Readability
Good locators make your tests easier to read and understand. They act as a form of documentation, explaining what elements your tests are interacting with. - Performance
Efficient locators contribute to faster test execution. By reducing the time it takes to find elements, you can significantly speed up the overall execution time of your test suite.
Test tagging
Tagging tests using a convention such as the @ syntax in Playwright offers a streamlined way to categorize and manage tests in a project. This built-in convention can be adhered to by teams for better organization, filtered test execution, and enhanced reporting. By appending tags like @smoke and @regression directly to the test name, teams can quickly identify the purpose of each test.
Syntax and Implementation
In this convention, you would append or prepend the @ tag directly to the test name. Here's an example:
test('@smoke calculates sum correctly', ({ page }) => {
  // ...
});
In this example, @smoke is a tag indicating that this is a smoke test.
Next, you can run all the smoke tests specifically with the following command:
npx playwright test --grep @smokeYou can also skip all the tests by inverting the grep like so:
npx playwright test --grep-invert @smokeTo run multiple tags (logical OR operator), add a pipe character in between tags like so:
npx playwright test --grep "@smoke|@regression"Conclusion and Next Steps
As we draw this comprehensive Playwright tutorial to a close, it's essential to reflect on the journey we’ve undertaken together. From the foundational concepts to the more intricate and advanced features, we've delved deep into Playwright's capabilities, ensuring a thorough grasp of its functionalities.
Playwright, with its robust features and user-centric approach, empowers developers and testers alike to craft efficient, precise, and scalable test scripts for web applications. Throughout this tutorial, we aimed not just to understand but to practically apply the knowledge, ensuring that the theoretical merges seamlessly with the hands-on, culminating in a holistic learning experience.
Next Steps
- Practice Makes Perfect:
While the tutorial offered interactive exercises, there's no substitute for individual practice. Explore new projects, set up different configurations, and test diverse web applications. - Stay Updated:
Playwright, like most modern frameworks, undergoes constant updates and improvements. Regularly check for updates and keep abreast of the latest features and enhancements. - Explore Advanced Use-Cases:
This tutorial set the foundation. But Playwright has more to offer. Dive into advanced topics like CI/CD integration, parallel testing, and cross-browser testing. - Share and Mentor:
Knowledge grows when shared. Consider writing about your experiences, tips, and tricks with Playwright. Alternatively, mentor peers and newcomers, solidifying your understanding while aiding others.