Building a metal-as-a-service using Intel-based computers and Ansible
Learn how to deploy and manage a server cluster with MAAS and Ansible. This comprehensive guide covers everything from setup to configuration.

In this tutorial, you will learn how to build a metal-as-a-service (MAAS) infrastructure using Intel-based computers. MAAS is an open-source platform that allows you to manage and deploy your bare-metal servers quickly and easily. With the help of Intel AMT, you can remotely start, stop, and power cycle your servers. We will also be using Ansible, a popular automation tool, to automate tasks on all the computers simultaneously. By the end of this tutorial, you will have a scalable and efficient infrastructure that can handle various workloads.
What is a metal-as-a-service?
A metal-as-a-service, or MAAS, is a software-defined infrastructure management platform that allows you to quickly and easily manage your bare-metal servers at scale. Essentially, MAAS provides a way to treat your physical servers like cloud resources by abstracting their hardware details and making them easier to manage.
Using MAAS, you can deploy a range of operating systems and applications on your servers, either in a public or private cloud environment. This means that you can spin up new servers as needed, without having to manually install and configure them. MAAS automates the process of provisioning, commissioning, and decommissioning servers, making it a powerful tool for managing large-scale data center infrastructures.
With MAAS, you can also ensure that your servers are always up to date and properly configured. You can define custom configurations for your servers, and MAAS will automatically apply those configurations as needed. This helps to ensure that all of your servers are running the same software and configurations, which can simplify troubleshooting and maintenance tasks.
Overall, MAAS provides a powerful way to manage your physical servers at scale, and it can be especially useful for organizations that need to deploy and manage large numbers of servers in a flexible and efficient way.
Canonical MAAS
Canonical MAAS is an open-source platform for building and managing metal-as-a-service infrastructures. It provides a web-based interface for managing your servers, along with a range of tools for automating server deployment, configuration, and management.
One of the key features of Canonical MAAS is its support for a range of different server hardware, including Dell, HP, IBM, and other servers. This makes it a flexible platform that can be used with a wide range of different data center infrastructures.
Using Canonical MAAS, you can easily provision and deploy servers in a range of different configurations. You can define custom configurations for your servers, such as specifying the operating system, network settings, and other parameters. Once you have defined your configurations, you can quickly and easily deploy them to your servers using MAAS's automated provisioning tools.
In addition to server provisioning and deployment, Canonical MAAS also provides tools for server monitoring and management. You can use MAAS to monitor the status of your servers, view performance metrics, and troubleshoot issues as they arise. MAAS also provides tools for automating server maintenance tasks, such as software updates and patch management.
Overall, Canonical MAAS provides a powerful platform for building and managing metal-as-a-service infrastructures. Its flexibility, automation tools, and comprehensive management capabilities make it a great choice for organizations that need to manage any-scale data center infrastructures.
Infrastructure overview
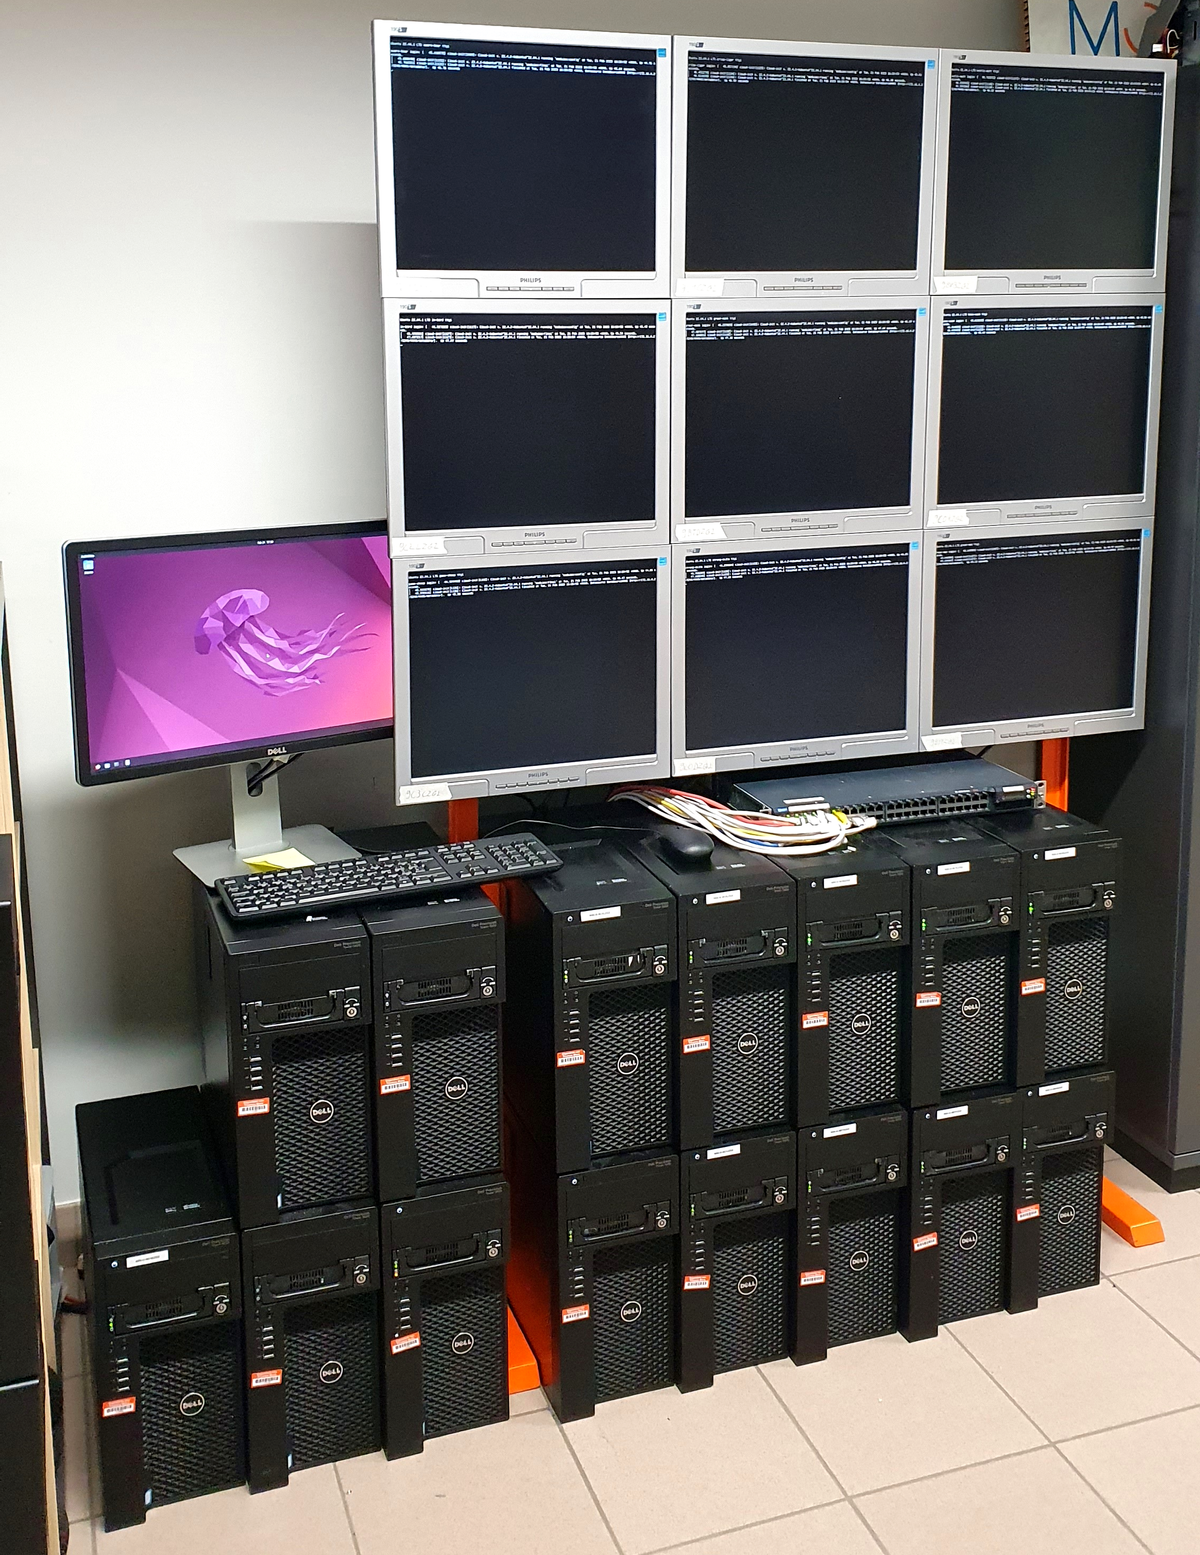
In this section, I'll provide an overview of the infrastructure I've built using MAAS and the associated hardware components. I've used 14 Dell OptiPlex computers, with nine of them equipped with two NVIDIA Quadro K620 GPUs each. I've also added another computer to act as the MAAS region and rack controller.
The Dell OptiPlex computers are being used as a combination of GPU compute nodes and general compute nodes. The five computers without GPUs are being used as general compute nodes, while the nine computers with GPUs will be used for GPU-accelerated workloads.
To simplify the process of adding new nodes to the infrastructure, I've set up the computers to UEFI iPXE boot over the network. With this configuration, MAAS provides the computers with an IP address and TFTP information to PXE boot, which allows them to auto-discover the MAAS region and rack controller. This auto-discovery process is made possible by the fact that all the computers are in the same VLAN, which ensures that the DHCP and TFTP requests from the computers are forwarded to the MAAS region and rack controller.
With this setup, I can quickly and easily add new nodes to the infrastructure by simply connecting them to the network and powering them on. The nodes will automatically be discovered by MAAS, which will then deploy the appropriate operating system and configurations to the nodes.
A Juniper L3 switch is being used to interconnect all the computers, which provides high-speed connectivity and helps to minimize latency between the nodes.
The MAAS region and rack controller computer serves as the central management point for the infrastructure. From here, I can configure and deploy new servers, monitor the status of the existing servers, and manage the overall infrastructure.
Intel AMT
I'll now discuss how I've used Intel Active Management Technology (AMT) to remotely start and manage the Dell OptiPlex computers in my infrastructure.
Intel AMT provides a range of management and security features that can be accessed remotely, even when the computer is turned off or the operating system is not functioning. With AMT, I can remotely power on and off the computers, perform BIOS configurations, and access the console for troubleshooting.
To enable AMT on the Dell OptiPlex computers, I had to ensure that the computers were equipped with compatible hardware and that the AMT settings were enabled in the BIOS. Once this was done, I was able to configure the AMT settings using the Intel Management Engine BIOS Extension (MEBx). The default password for the Intel MEBx is admin.
With AMT enabled, I can remotely power on the computers using the web interface or the Intel AMT Commander tool. This allows me to turn on the computers from anywhere on the network, even if I'm not physically present in the data center. In Canonical MAAS this is integrated in the software and allows MAAS to automatically start, stop and power cycle computers.
In addition to remote power management, AMT also provides other management features that can be accessed remotely. For example, I can remotely access the BIOS configuration settings, which allows me to make changes to the BIOS without physically accessing the computer. I can also access the console remotely, which allows me to troubleshoot and diagnose issues without needing to be physically present.
Boot process
When a computer is turned on, it needs to go through a boot process to load the operating system. In a metal-as-a-service setup, we use a network boot process called iPXE/PXE to boot the computer over the network instead of from a local hard drive.
PXE (Preboot eXecution Environment) is a protocol that enables computers to boot from the network. iPXE is a modern version of PXE that provides additional functionality and flexibility. When a computer with PXE/iPXE support is turned on, it will first attempt to boot from a local hard drive. If it doesn't find a bootable operating system, it will request an IP address from a DHCP (Dynamic Host Configuration Protocol) server.
The DHCP server is responsible for assigning the computer an IP address, subnet mask, and default gateway. It can also provide additional information, such as the address of a TFTP (Trivial File Transfer Protocol) server.
The TFTP server is responsible for providing the boot files required for the computer to boot over the network. These files include the kernel and initramfs, which are essential components of the operating system. The kernel is the core of the operating system, while the initramfs is a temporary file system that is loaded into memory during the boot process.
The kernel and initramfs work together to load the operating system. The kernel is responsible for managing system resources and executing processes, while the initramfs provides temporary storage for files and drivers needed during the boot process. Once the operating system has been fully loaded, the initramfs is no longer needed and is removed from memory.
In a metal-as-a-service setup, the PXE/iPXE boot process is used to automatically discover and provision computers with the necessary operating system and software. This allows for efficient management of large-scale deployments and enables the rapid deployment of new resources as needed.
Region+Rack controller setup
To set up a region+rack controller for MAAS, you will first need to choose an appropriate Linux distro. In this case, Ubuntu Desktop 22.04 was used, but the Server version should work just as well. The Desktop version was chosen here to allow for the use of the web interface locally. The key component here being that your distro has support for the snap package manager.
Once you have chosen your Linux distro, the next step is to follow the MAAS documentation to install the software. The first command to run is the following:
sudo snap install --channel=3.3 maasIt can be found on the following page: https://maas.io/docs/how-to-install-maas. This command will install the necessary packages for MAAS to run using the snap package manager.
After MAAS has been installed, you will need to install a test database. It's important to note that this is not a production-ready database and should not be used in a production environment. To install the test database, run the following command:
sudo snap install maas-test-dbOnce the test database has been installed, you can initialize MAAS by running the command:
sudo maas init region+rack --database-uri maas-test-db:///This command tells MAAS where to find the database and what role this particular instance of MAAS has.
Once MAAS has finished setting up, you should be able to access the web user interface by going to http://localhost:5240/MAAS. To log in, you will need to create an administrator account by running the command:
sudo maas createadminYou will be prompted to enter the details for the administrator account, including a username, password, email address, and SSH keys on GitHub (if applicable). If you have a GitHub account, you can use the format gh:yourusername to automatically import your SSH keys.
Overall, setting up MAAS requires a few steps, but following the documentation closely should make the process straightforward. With a properly configured region+rack controller, you'll be able to manage your cloud infrastructure efficiently and effectively.
Adding nodes
Firstly, it is important to ensure that the nodes that you wish to add to MAAS are capable of network booting using the iPXE protocol. Additionally, if you plan on using the Intel AMT functionality within MAAS, you will need to set up an Intel AMT password and enable network access for each node. This will allow you to power on and off the nodes remotely, and also use the KVM feature to interact with the console of the node.
To add the nodes to MAAS, you can use the web UI. Once logged in as an administrator, you can navigate to the "Nodes" section and then click on "Add Node". Here, you will see options to add nodes manually, or to use the commissioning process to add nodes automatically.
To add nodes manually, you will need to provide details such as the hostname, IP address, MAC address, and the number of CPUs, RAM and storage on each node. This is a time-consuming process, especially if you have a large number of nodes to add.
To add nodes automatically, you can use the commissioning process. In this process, you need to boot each node using iPXE and MAAS then installs a small operating system on it. This allows MAAS to gather information about the hardware on the node, such as the number of CPUs, RAM and storage. Once this information is gathered, you can then assign the nodes a role in your cloud infrastructure, such as being part of a specific rack or being designated as a compute node.
After the commissioning process is complete, you will need to set the Intel AMT password and IP address for each node in the MAAS web UI. This will allow MAAS to remotely power on and off the nodes, and also use the KVM feature to interact with the console of the node.
Once the nodes have been added and configured in MAAS, you can then deploy Ubuntu or other operating systems to them. This can be done through the MAAS web UI, where you can select the nodes you want to deploy to, and then select the operating system you wish to install. MAAS will then take care of the installation process, ensuring that each node is configured correctly.
Ansible
Ansible is a powerful and popular open-source automation tool that is designed to help you manage multiple servers and automate tasks. With Ansible, you can easily automate various tasks, including provisioning, configuration management, application deployment, and more. It is built on top of Python and uses a simple YAML syntax to define tasks and playbooks, making it easy to read and write for both developers and system administrators.
One of the key advantages of Ansible is that it is agentless, meaning you don't need to install any software on the remote hosts you are managing. Instead, Ansible uses SSH to connect to the hosts and run commands remotely, making it easy to manage both Linux and Windows hosts from a single control machine.
Using Ansible, you can easily perform a wide range of tasks on multiple hosts, from basic server administration tasks like shutting down or rebooting the hosts, to more complex tasks like installing software, configuring network settings, or deploying applications. You can also use Ansible to automate the setup and configuration of a Kubernetes cluster, which can help streamline the deployment and management of containerized applications.
In addition to its powerful automation capabilities, Ansible also has a large and active community of users and contributors, which means there are a wide range of resources available to help you get started and troubleshoot any issues you may encounter.
The inventory.yaml file is an inventory file that lists the nodes or hosts that will be managed by Ansible. In this particular file, there are two groups defined: gpu_nodes and controller_nodes. gpu_nodes group contains 9 hosts with their IP addresses listed under the hosts key and the ansible_user variable is set to ubuntu for this group. Similarly, controller_nodes group contains only one host with its IP address and ansible_user variable. The cluster group is a child group of gpu_nodes and controller_nodes.
gpu_nodes:
  hosts:
    172.16.0.121:
    172.16.0.122:
    172.16.0.123:
    172.16.0.124:
    172.16.0.125:
    172.16.0.126:
    172.16.0.127:
    172.16.0.128:
    172.16.0.129:
  vars:
    ansible_user: ubuntu

controller_nodes:
  hosts:
    172.16.0.233:
  vars:
    ansible_user: ubuntu

cluster:
  children:
    gpu_nodes:
controller_nodes:The playbooks/01-reboot-hosts.yaml file is a playbook file that defines a set of tasks that will be executed by Ansible on the hosts listed under the cluster group in the inventory.yaml file. The name key is used to give a descriptive name to the playbook and each task. In this playbook, there are two tasks defined. The first task Ping hosts is using the ansible.builtin.ping module to check if the hosts are reachable. The second task Reboot is using the ansible.builtin.reboot module to reboot the hosts listed under the cluster group. The become key is set to true to execute the task with root privileges.
- name: Reboot
  hosts: cluster
  tasks:
    - name: Ping hosts
      ansible.builtin.ping:
    - name: Reboot
      become: true
ansible.builtin.reboot:By running the command ansible-playbook -i inventory.yaml playbooks/01-reboot-hosts.yaml, the playbook is executed on the hosts listed under the cluster group. The -i flag specifies the path to the inventory file and the playbooks/01-reboot-hosts.yaml is the path to the playbook file.
Ansible has extensive documentation available on its official website (https://docs.ansible.com/ansible/latest/index.html). The documentation covers various topics ranging from getting started with Ansible to advanced features like modules and plugins.
Each module also has its own documentation page that explains what the module does, its options and usage examples. These pages can be accessed through the Ansible documentation website.
Additionally, Ansible has a vibrant community of users who share their experiences and code on various platforms like GitHub and Stack Overflow. These resources can be used to find examples of Ansible code for specific use cases or to get help with troubleshooting.
The Ansible VS Code extension is a useful tool for working with Ansible code in Visual Studio Code. It provides features like auto-completion, linting, highlighting, and more to make writing and editing Ansible playbooks easier and more efficient. The extension can be installed from the Visual Studio Code Marketplace and can be used to write and execute Ansible playbooks directly from within the editor.
Conclusion
In conclusion, in this project, I have demonstrated the setup of a bare-metal machine deployment tool, MAAS, and how to use it to manage a cluster of machines. I have explained how to install MAAS on an Ubuntu system and how to add nodes to the cluster by commissioning them and configuring Intel AMT.
Additionally, I have also shown how to use Ansible to manage the cluster of nodes, and I have provided an example of how to reboot the nodes using an Ansible playbook.
This project is just a starting point for more complex deployments, as there are many other possibilities with MAAS and Ansible. The MAAS documentation provides an extensive guide to its features, and the Ansible documentation covers many tasks that can be used to manage and automate infrastructure.
Overall, the use of MAAS and Ansible can significantly simplify the management of large clusters of machines, making it possible to deploy and manage infrastructure more efficiently and effectively.